


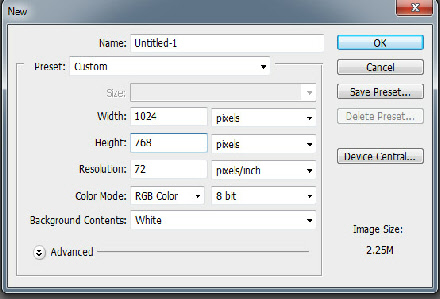
Open Photoshop and go to File>New the following dialogue screen opens.
Enter the details as shown. Width 1024 px, Height 768 px, Resolution 72 PPI, Colour RGB, Bit Depth 8.
At this point you can save these settings as a Preset using the, guess what, Save Preset Button on the right.
The default Preset name will be 1024 px X 768 px which is fine or you can call it anything you want. This just makes it quicker the next time you want this size of canvas with these settings, it will be available from the Preset Drop Down Menu.
Click OK. And a screen appears which is just the empty canvas.
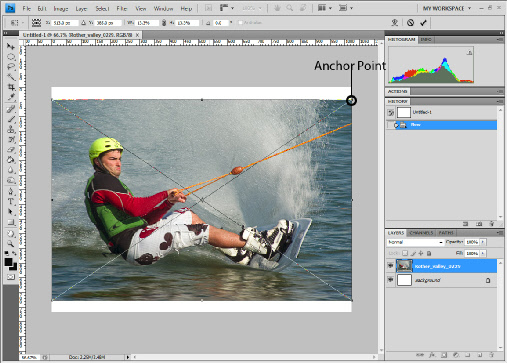
Open Bridge, find and highlight the picture you want. Then go to File>Place>In Photoshop.If it’s a Raw file the Raw Converter will open and you can make adjustments clicking Open will Place the Image, if it’s not a Raw file the image will be placed on the New Canvas either way the Transform Tool will already be opened as in this screenshot.
As you can see PS has Placed the image centred onto the Canvas using all the width leaving a gap top and bottom, this is Aspect Ratio again.
PS has also placed the Transform Tool around the Image, it has 8 Anchor Points (the one top right is shown). These are what we click and drag to alter the size of the picture to fit our canvas. By default if you click and drag a Transform Tools Anchor Point it will distort the Image, if our Image is just a pattern or texture that may well be fine, but for our Image we need to press and hold the Shift Key while we click and drag then the Images Aspect Ratio will be maintained.
We can do lots more with the Transform Tool, we can rotate the Image, alter Perspective, Skew, Warp, but that’s something for a wet Tuesday evening when we haven’t got anything else to do!
When your happy with your crop hit the Enter Key or click the Green Tick at the top of the screen.
You can recall the Transform Tool by using the shortcut Ctrl + T if you find you need to tweak.
If you look at the thumbnail on the Layers Palette, you’ll see an icon in the bottom
right hand corner, this signifies that this picture is a smart object. If the Image
was a Raw file double clicking on the thumbnail will open the image up in the Raw
Converter where you can make changes to your picture and clicking on the Done button
will apply them to the picture, anything you do to a Smart Object is totally loss-
Normally we would make the picture 8 bit, Flatten the Image, Sharpen and Save with your titled file name, but as this is a Smart Object there’s a twist.
Make the Image 8 bit (Image>Mode>8 Bit/Channel), then apply High Pass sharpening
(here) just as normal. When you’ve finished you’ll notice some more entries in the
Layers Palette just below the copied image, if you double click on the High Pass
entry the High Pass dialogue box appears, now you can alter the slider in real time
and see the effect the slider has on your picture. If your happy this is the time
to Flatten the Image (this is where any changes you have made including the re-
The crop method is quick, but this method gives far more control and you can go back without having to revert back and start again.
This method of re-
Presentation
The methods listed so far are only the basics. There’s a whole cornucopia of ways of presenting your Images, but simple is often best.
It may be that you don’t want to crop your picture, then the appearance of the background
becomes important. With Method 2 we have laid out the full screen as it will be displayed
by our projector, we can arrange our Image onto that screen in any way we wish, in
any position, centred, off centre, rotated, with a border, blending into the background
colour. With the background we can alter colour, texture, drop shadows, it can even
be another picture -
In PS we can automate the whole process by recording an Action which we can then edit.
PS to some people is a chore, necessary to tweak an Image and re-
Resizing Images for Digital Competitions and AV’s Method 2
In the first re-